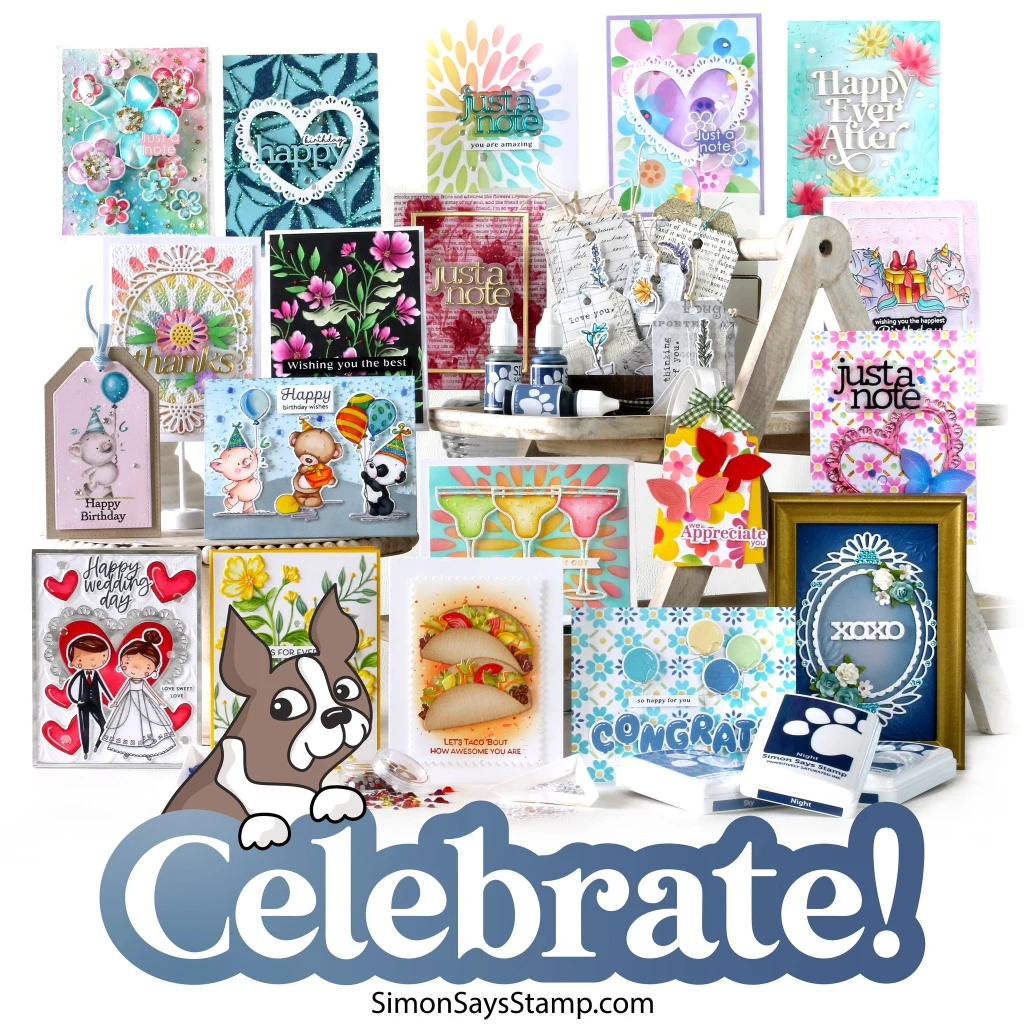
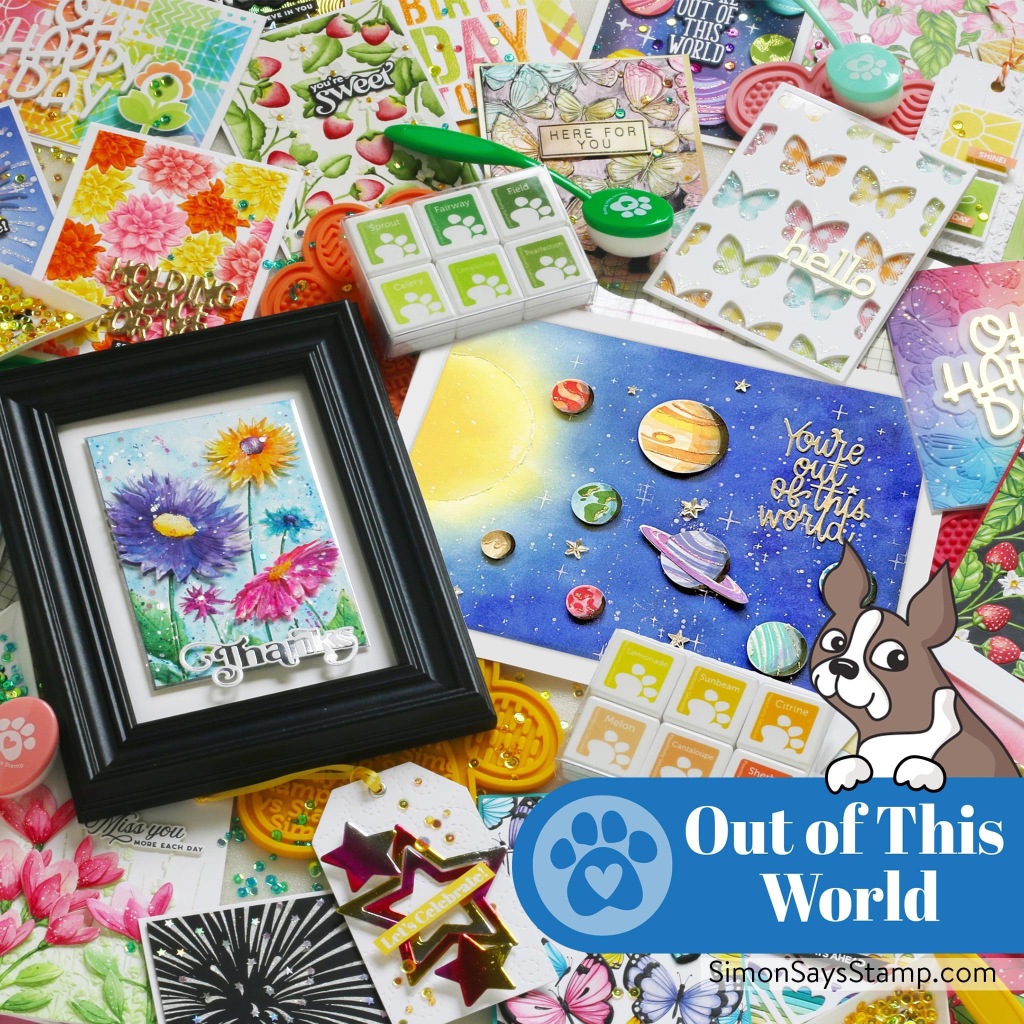
It’s release day! This new collection from Simon Says Stamp is so fun! There is something for EVERYONE!
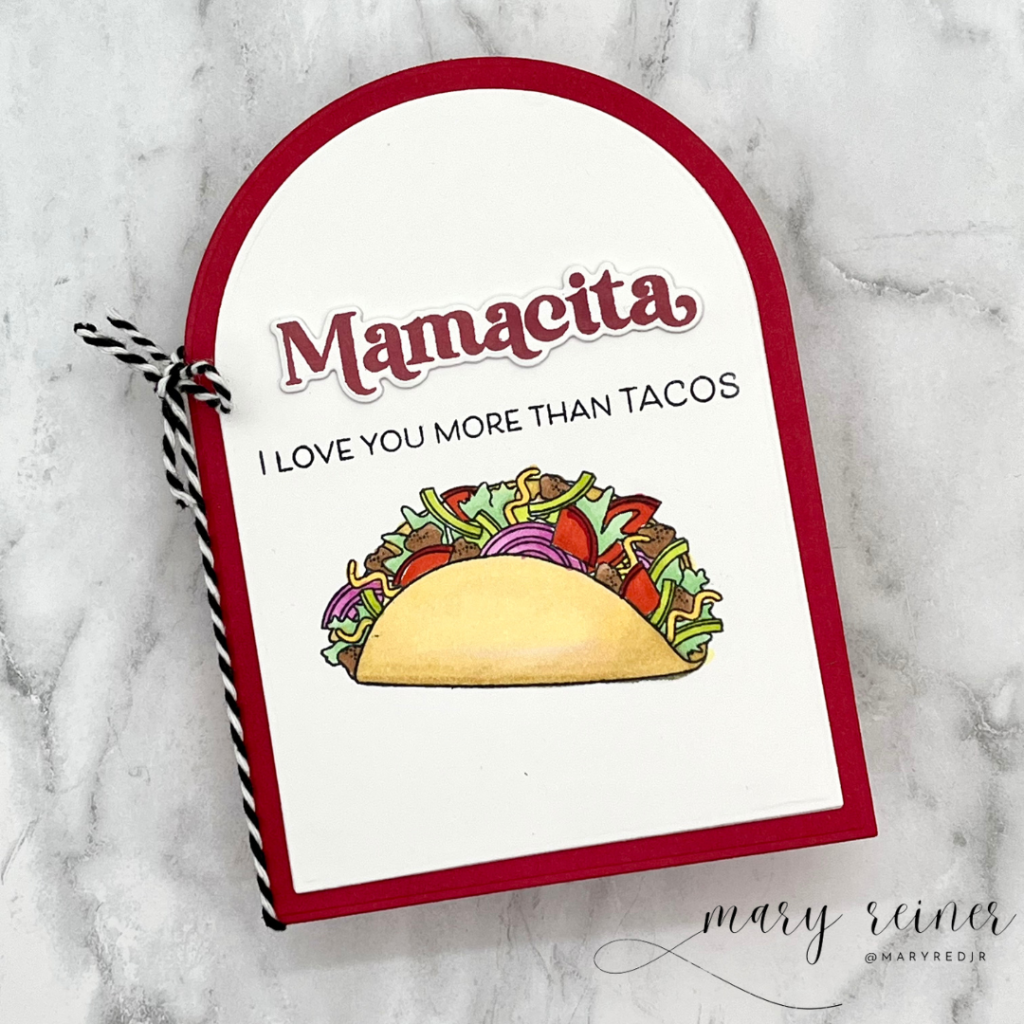
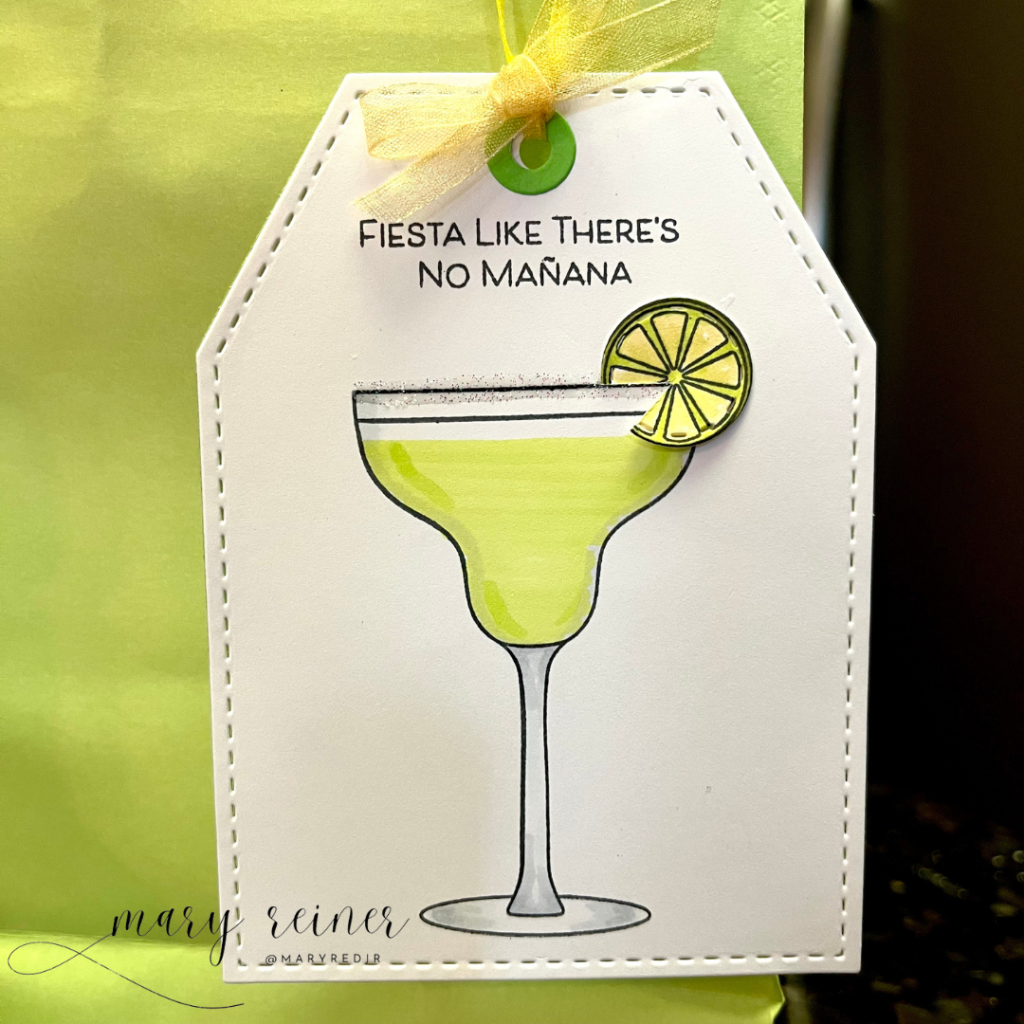
I got a chance to create with the “Taco ‘Bout It” stamp set. Such a cute set with adorable images and sassy sentiments. I created three projects with it.
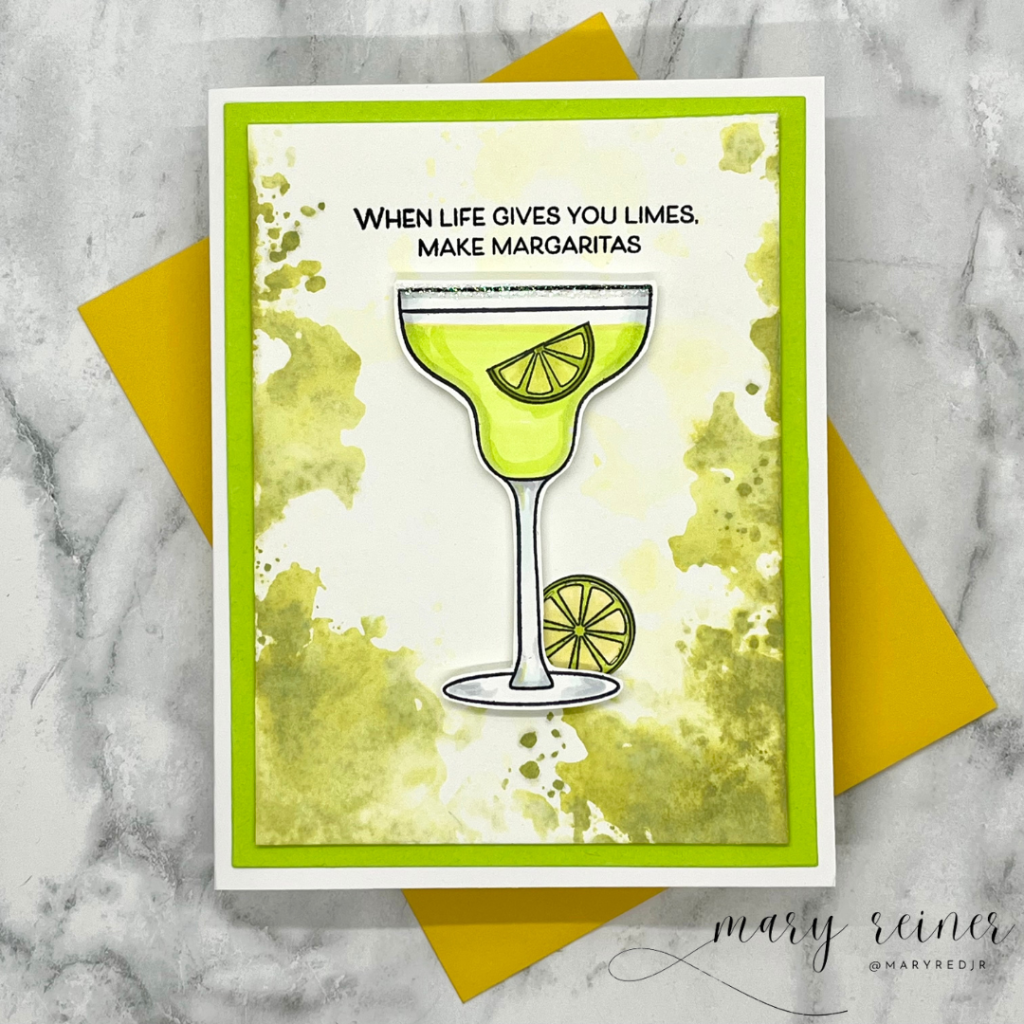
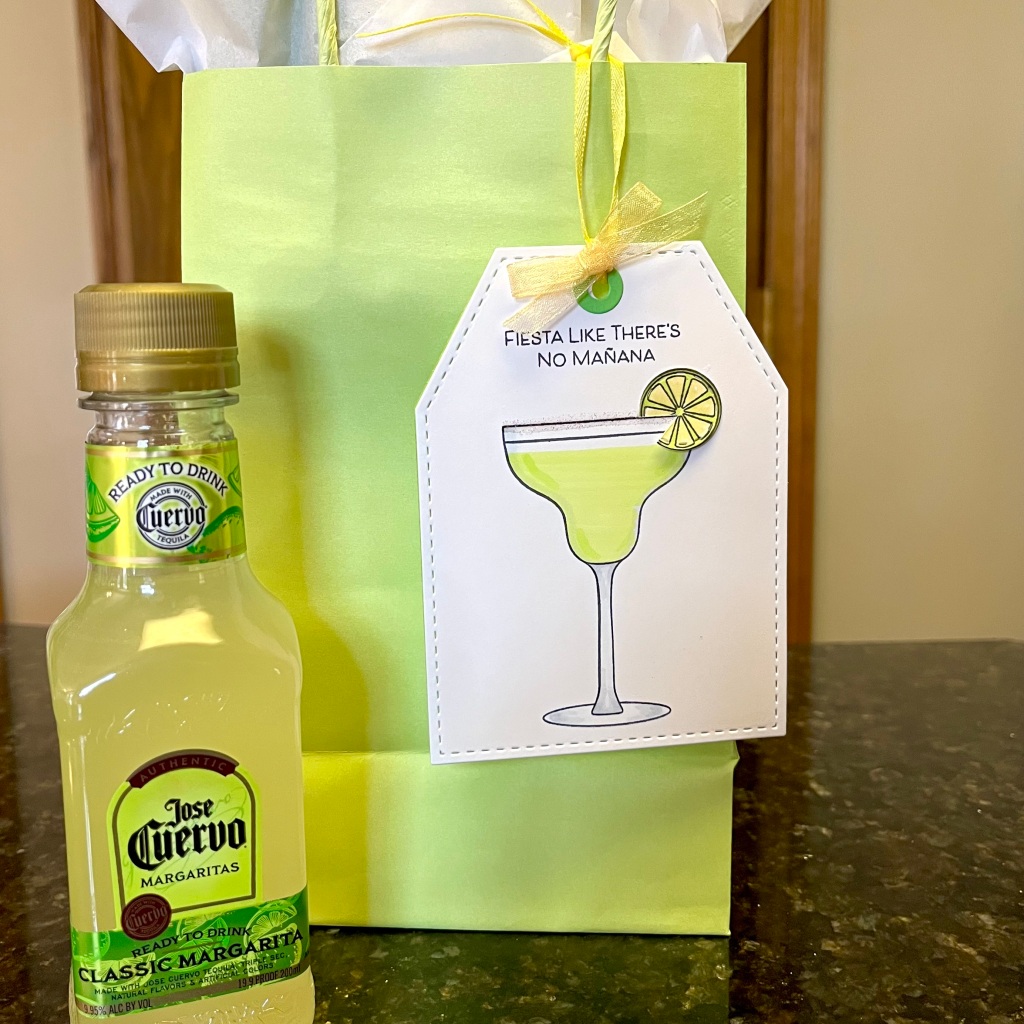
Project #1: Margarita Card
I started by ink smooshing Squeezed Lemonade and Peeled Paint Distress Oxides onto watercolor paper. While that was drying, I stamped, colored, and die cut the margarita and lime images from the “Taco ‘Bout It” stamp set. I heat embossed with Wow Clear Sparkle embossing powder to look like the rim was dipped in salt. I stamped the sentiment and adhered everything to an A2 card base.
Project #2: Shaped Taco Card
I used the following products to create this card:
You can check out the whole new release HERE. And be sure to tune into Simon Says Stamp YouTube channel this Friday (April 19th) for tons of inspiration!
It is time once again for another awesome release from Simon Says Stamp. The Be Bold release has lots of fun products to inspire your creativity. Here is a link to the whole release: https://tinyurl.com/v7zch938
Card #1:
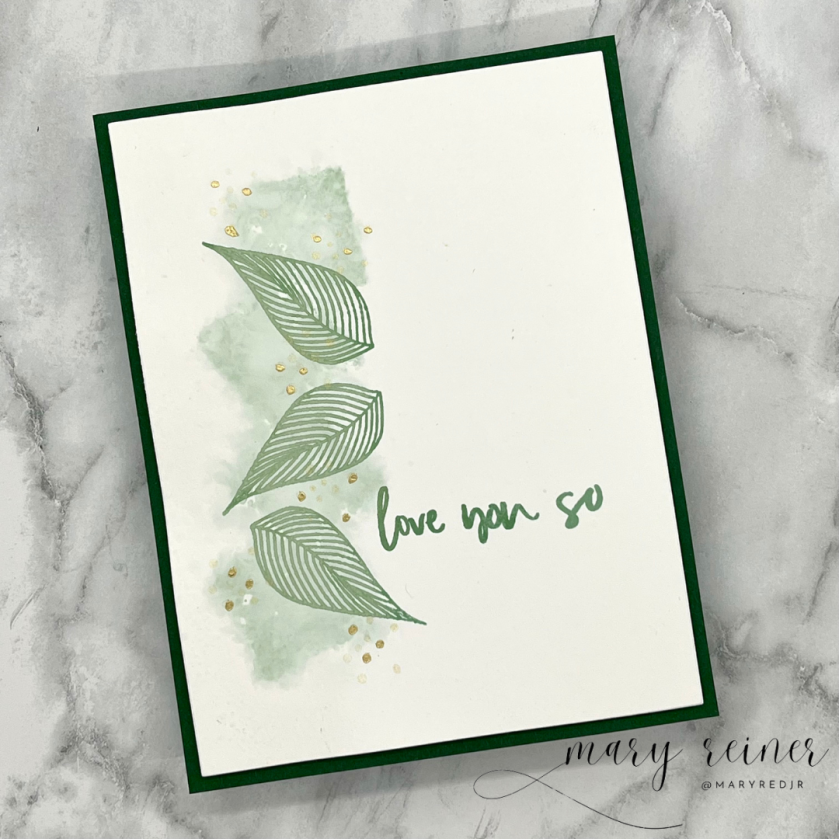
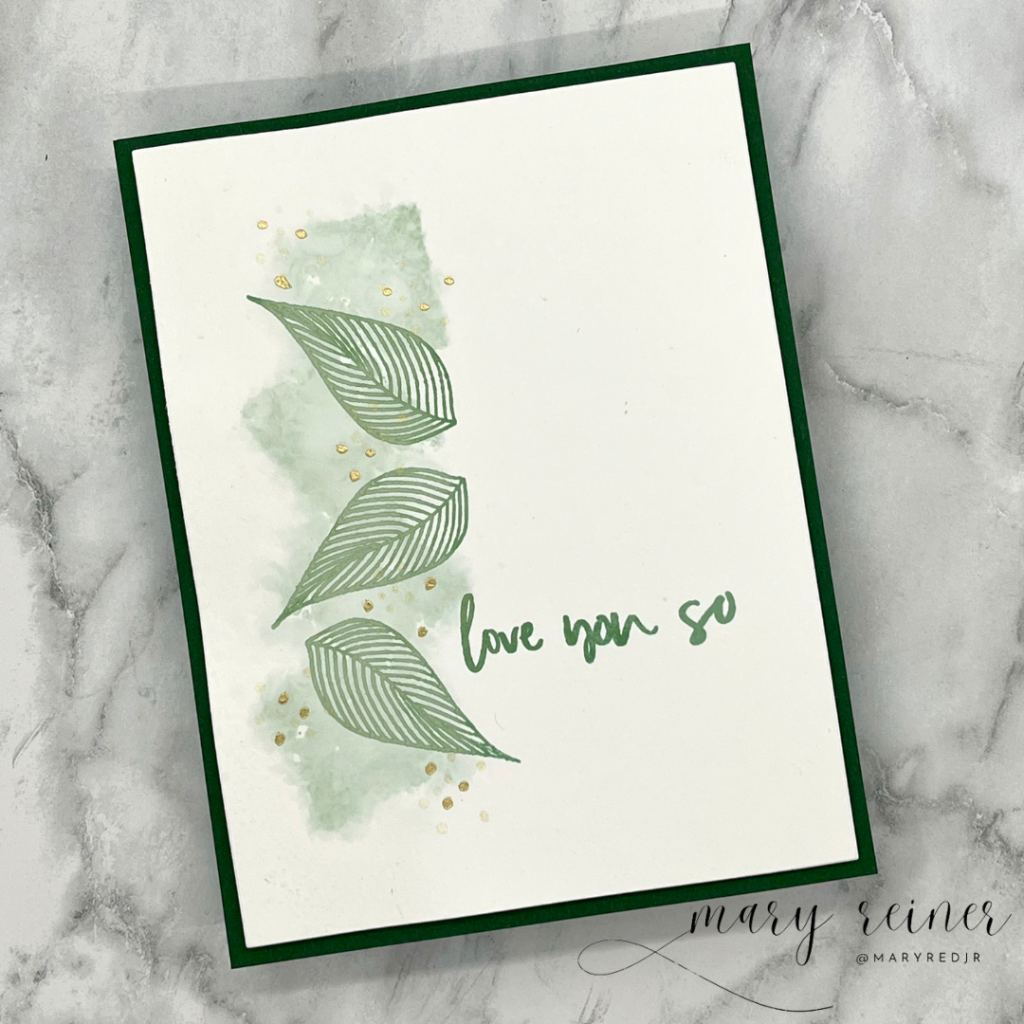
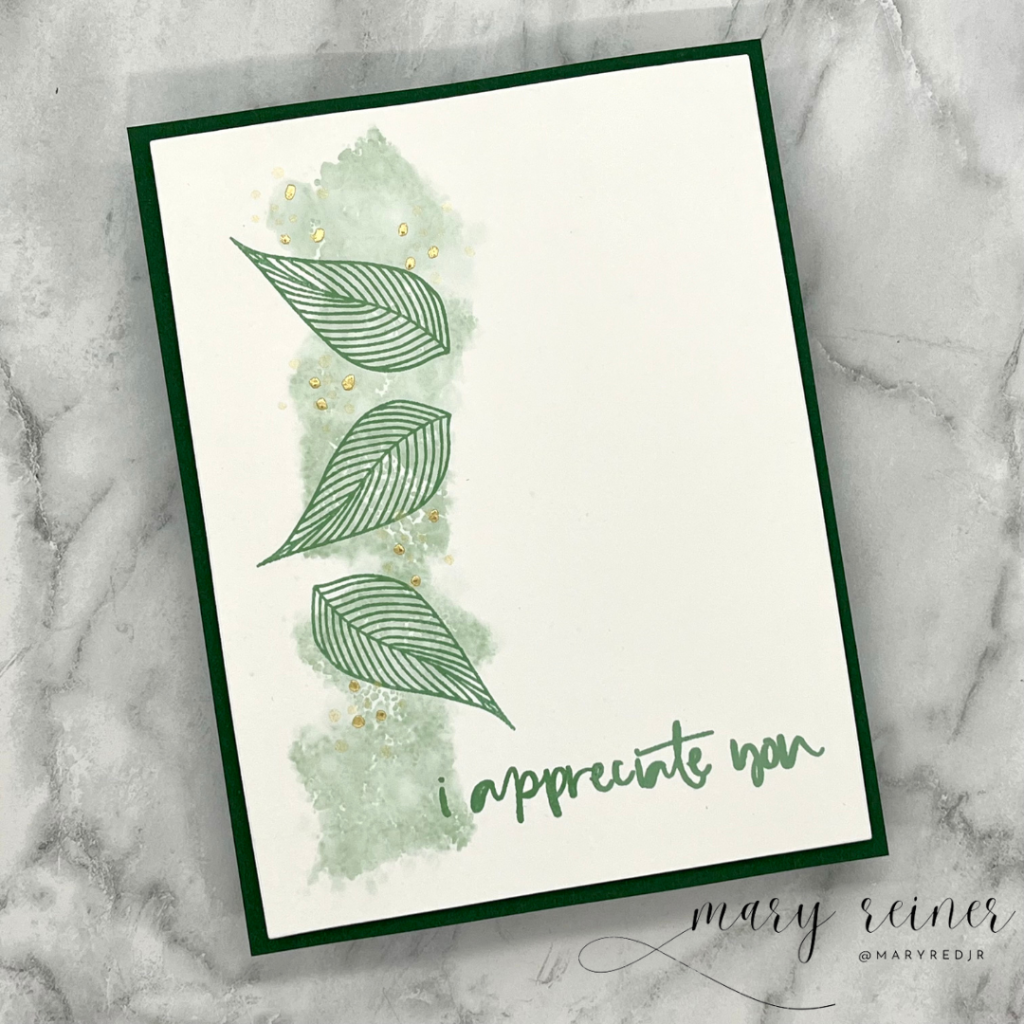
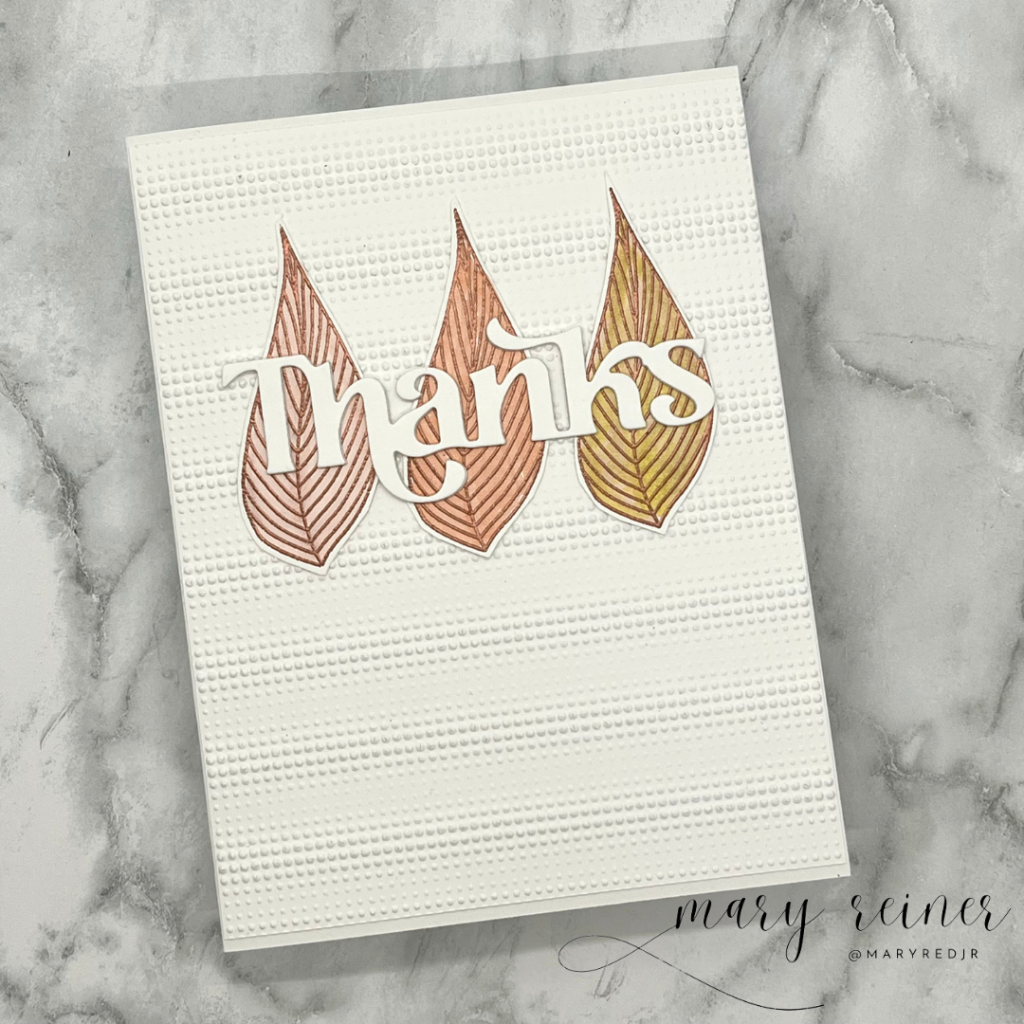
I played with the new Dreamy Leaves stamp set. I think this is a very versatile set! The images would be appropriate for almost any occasion, and the sentiments are so sweet too. I created two similiar cards.
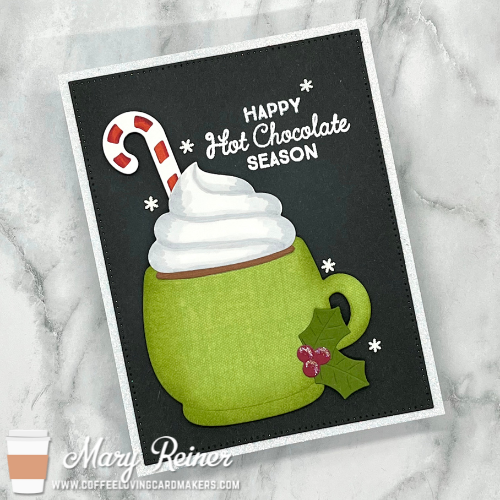
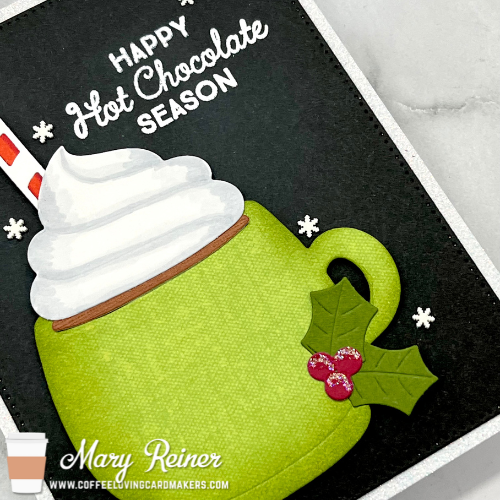
I thought I would celebrate by creating a hot cocoa card!
Have you ever had trouble with your embossing powder? I have read that after some time, some powders can go bad. Have you experienced this? I used my go-to white embossing powder, but I did not like how it embossed. It looked bubbly and didn’t melt well. I tried embossing again and had the same result. So I ended up re-stamping and embossing with a brand new powder. I liked the results much better! I think it’s time for me to get rid of that older powder
For my card, I used the following products:
~My Favorite Things Hug in a Mug stamp set for the sentiment
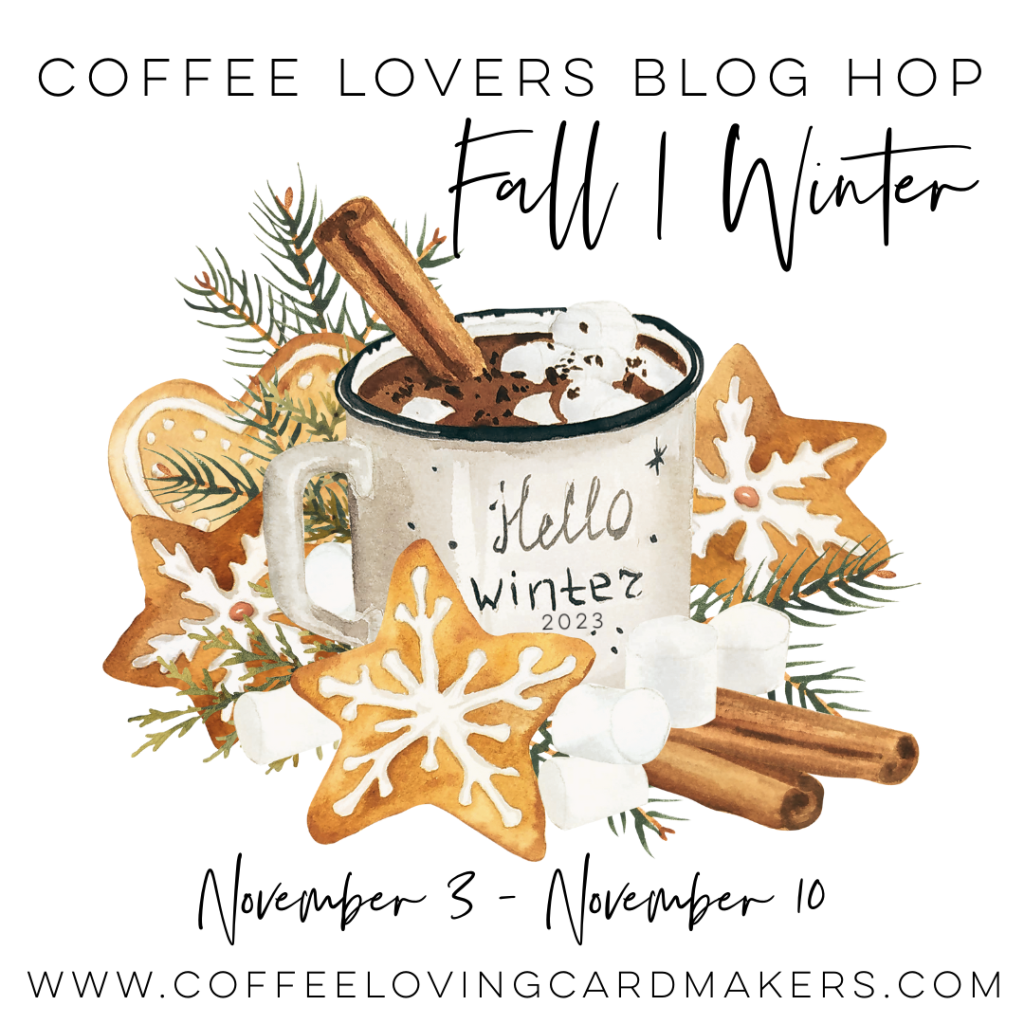
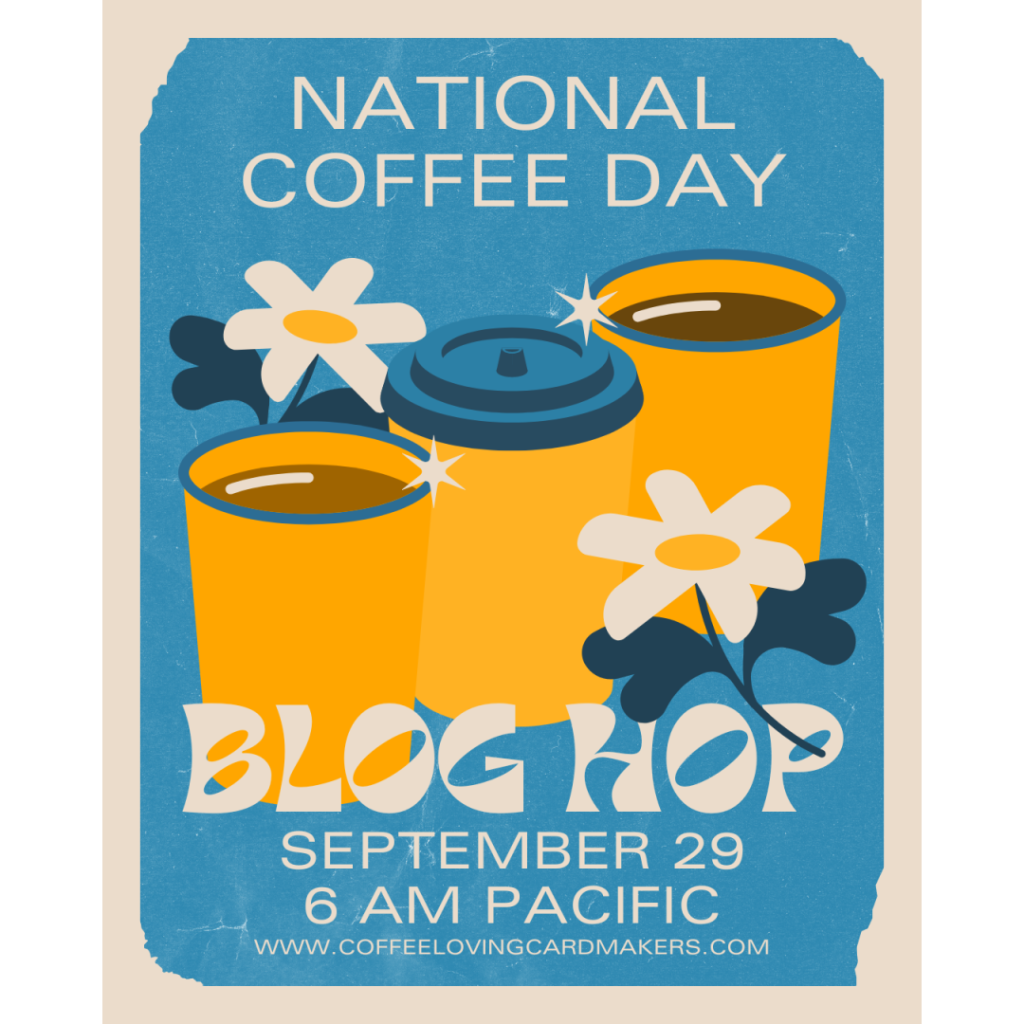
It’s time once again for the Coffee Lovers Blog Hop! Be sure to link up your newly designed, caffeinated project to the blog for a chance to win a prize from one of our super sponsors. Check out the Coffee Loving Cardmakers Blog for all of the details! http://coffeelovingcardmakers.com
My card features a bunch of products from super sponsor Newton’s Nook Designs. They have several coffee/tea themed sets that worked perfectly for my design.
I colored the images with Copic Markers and Spectrum Noir Tri-Blend Markers. The nose on the kitty is colored with a Sakura Black Glaze pen. The sentiment is stamped in GinaK Dark Chocolate ink and the steam is third generation stamping also in Dark Chocolate ink. I added foam tape to the back of the red mug to add dimension.
I hope this inspires you to create your own caffeinated project for Coffee Lovers Blog Hop!
It’s that time again. Time for another awesome release from Simon Says Stamp!
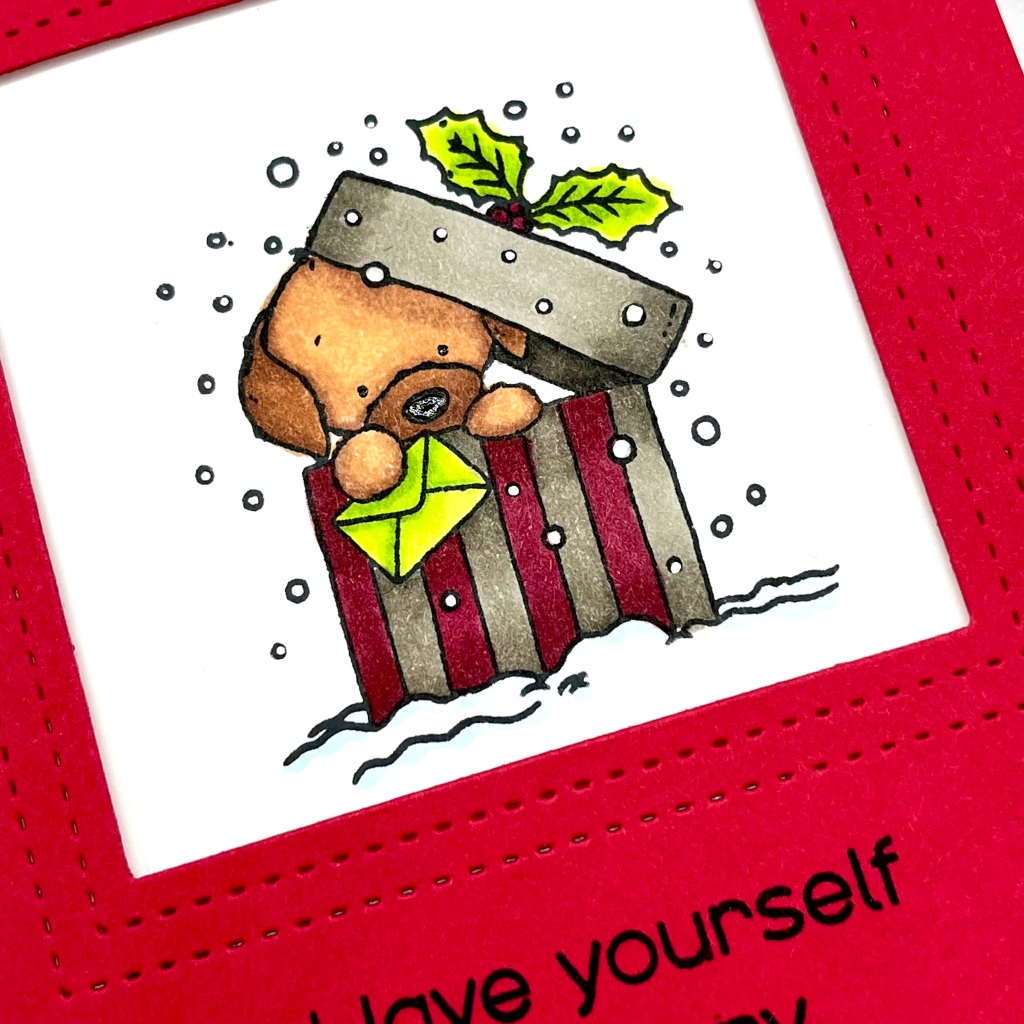
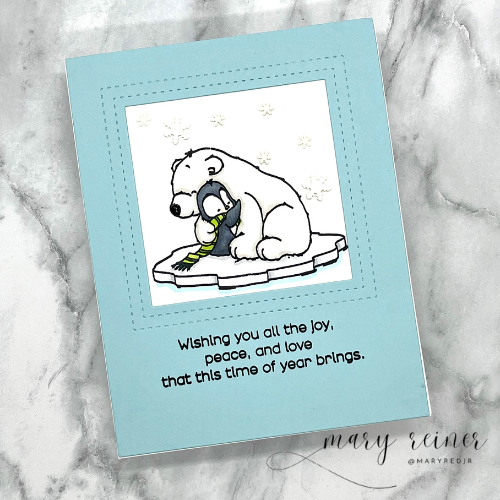
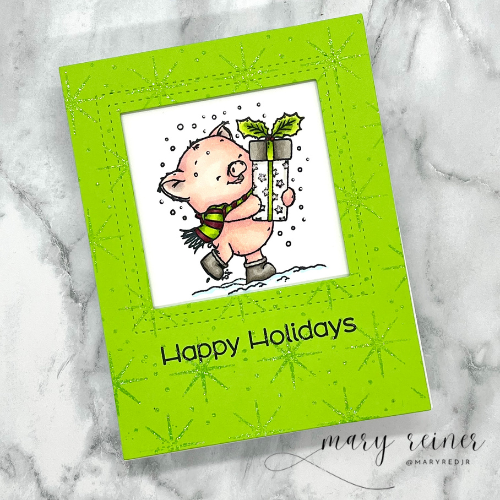
I was fortunate to receive the adorable Wintertime Critters stamp set to create with. I decided to use the same layout for all my cards, just stepping it up a bit each time. There are several cute images and lots of holiday sentiments in this set for your cardmaking. The images are fun to color and you can create a card quickly with them. Dies are available as well.
Card #1:
For this card, I stamped the dog image and colored him with Copic Markers. I colored the nose and dotted the eyes with a Sakua Black Glaze pen. I also used a white gel pen to fill in the snow flakes. Then, I die cut a red panel using Lawn Fawn’s Outside In Stitched Square stackable dies. But you could use any stitched square to acheive a similiar look. I stamped the sentiment onto the red panel and added foam tape to the back for dimension. I adhered the red panel to the white panel and added it to a top folding A2 card base.
Card #2:
For this card, I did some very simple Copic Coloring and once again colored the nose with the Black Glaze pen. This card was made exactly like the previous card, except I added some Trinity Stamp clay snowflake sprinkles to add some texture to the card.
Card #3:
I stepped up my final card by adding some sparkle to the background. To achieve this, I stamped the Simon Says Stamp Star cling stamp with embossing ink and sprinkled on Ranger embossing powder. I used my heat tool to melt the powder and I love the shine this added to my card. This little piggy likes the glitter too!
Three cards – one layout – stepped up a bit each time.
Which one is your favorite?
I hope you’ll head over and check out the entire new release! I have included my affiliate link for you to the shop.
Coffee beans are technically seeds. We call them beans because they resemble legumes.
There are two main types of coffee: Arabica and Robusta.
Only two U.S. states produce coffee: Hawaii and California.
Coffee drinkers tend to live longer. Research shows moderate consumption (3-4 cups a day) leads to a longer life , plus a reduced risk of cardiovascular disease, type 2 diabetes and Parkinson’s, according to Harvard Health Publishing.
So I guess we need to drink up!
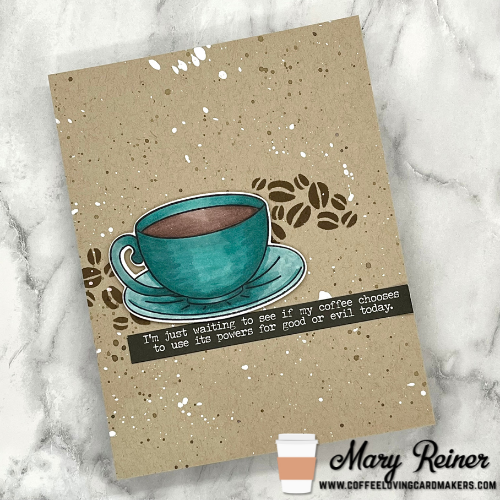
My card today features the following products:
~Simon Says Stamp Coffee Friends clear stamp and die set colored with the following Copic Markers: BG78, BG18, BG72, BG0000, E74, E77, and E27)
~Tim Holtz Ideaology Snarky Small Talk stickers
~Catherine Pooler Macciato Ink
~A Colorful Life Designs Coffee Stream stencil
~Neenah Desert Storm card stock splattered with white acrylic paint and Walnut Stain Distress Ink
Thanks for stopping by! Now go grab another cup of joe and be sure to check out the Coffee Loving Cardmakers Blog. There’s an awesome blog hop in honor of National Coffee Day and there is lots of amazing inspiration and prizes!
It is time once again for a new release from Simon Says Stamp. I feel like I say this all of the time, but this release is so fun!
I had the opportunity to create with the adorable “Right Stuff” stamp set.
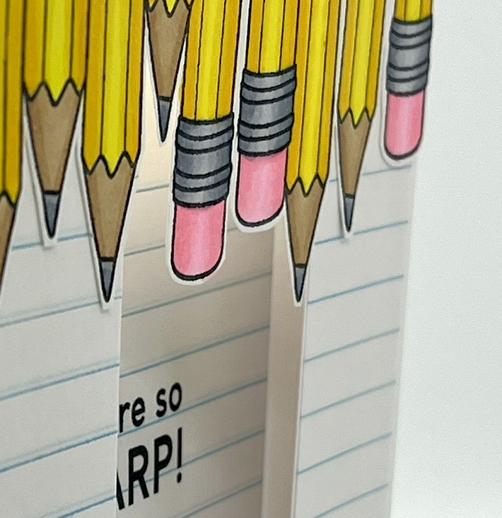
For my first project, I created a fun, pop up, bridge card.
This was my first time creating one, but I was inspired by a video from Jennifer McGuire.
To create my card, I started with a piece of 110# card stock that measured 5 1/2″ x 10 3/4″. To acheive the pop up effect, I scored my card stock at 1 1/4″, 2 1/4″ and 3 1/4″. Then, I turned the card stock 180 degrees, and added score lines in the same spots. Next, I accordian folded (or zig-zag folded) on the score lines. Using a bone folder is very beneficial to acheive the crisp folds. Once folded, the card measures 4 1/4″ x 5 1/2″ and will fit in a standard A2 envelope.
I cut some standard, notebook paper to fit on the flaps and also on the inside panel. I cut them just a bit smaller to fit in each section. You could cut the two outside pieces to fit exactly and they would be 1 1/4″ x 5 1/2″. Next, I stamped the sentiment on the notebook paper that will be going on the inside panel. Then, I adhered all of the notebook paper and made sure the lines lined up.
I stamped two of the pencil images and colored them with Copic markers. These are the colors I used: RV23, RV21, RV01, E11, E33, C1, C3, C5,Y02, Y08, and Y19.
I fussy cut the pencil strips (I did not have the coordinating dies at the time) and decided on the placement of them. I used my trimmer to cut them to fit my card and adhered them to the card base.
Bridge cards are fun and easy to create and the recipient can display it easily as well. I plan to give this card to one of my teacher collegues.
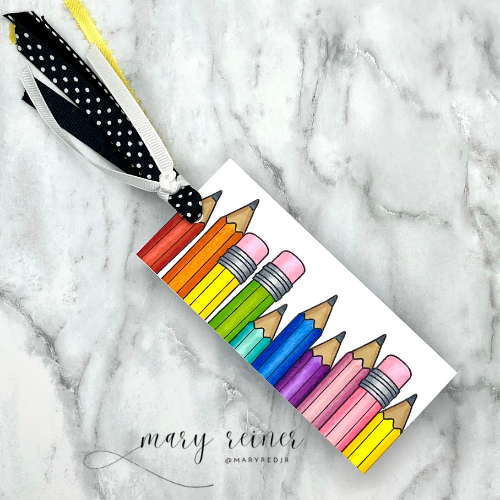
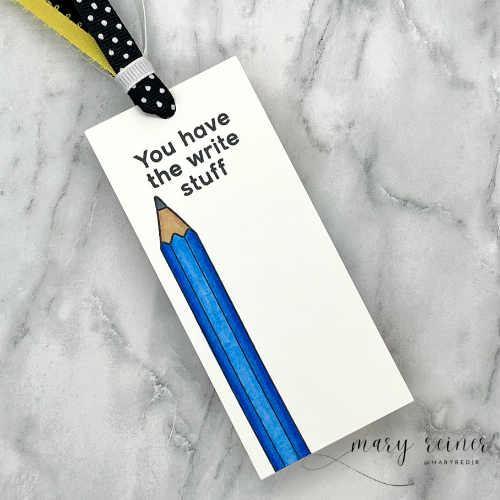
Project #2:
I created a colorful bookmark for my second project.
I started by cutting 2 pieces of 110# white card stock to 2″ x 4 1/2″. Then, I stamped the group of pencils on one piece, and a single pencil and sentiment on the other, because I wanted my bookmark to have two completed sides. I colored the images with the following Copic markers: E11, E33, C1, C3, C5, R29, R08, R05, R14,YR09,YR07, YR04, YR12, Y02,Y08,Y19, YG09, YG05, YG03, YG07, BG49, BG45, BG32, BG11, B28, B26, B24, B21, V09, V06, V04, V01, RV66, RV55, RV32, RV11, RV25, RV23, and RV21.
Next, I adhered the two pieces of card stock together and punched a hole at the top. I added lots of ribbon from my stash to complete the bookmark. How cute?!?
I hope you enjoyed my projects and will check out the entire new release from Simon Says Stamp.
Below is my affiliate link. I hope you will use it if you see some things you need. Thanks for stopping by!
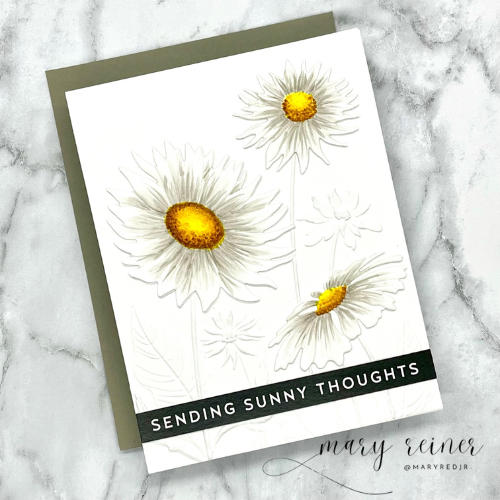
It’s that time again. Time for another fabulous release from Simon Says Stamp.
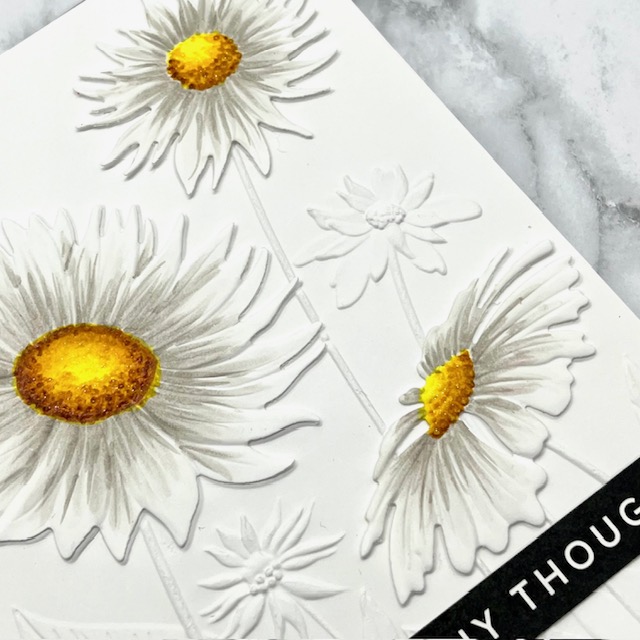
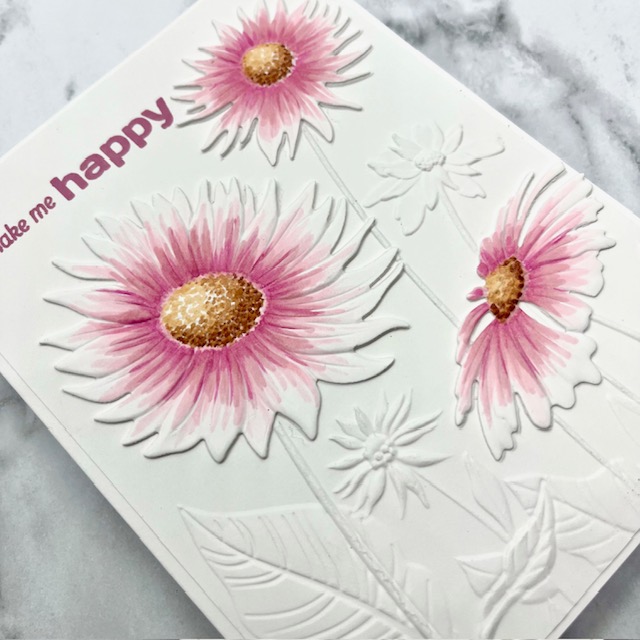
Today I am featuring a new 3D embossing folder and cutting die set called Splendid Daisies. I have been enjoying playing with this cool product. I was recently talking with some crafty friends and one of them mentioned that she thought embossing folders were making a comeback. I could not agree more! I love them for several reasons. First, the price point is reasonable, which makes it desirable. Next, embossing folders are a very versatile tool! Lastly, embossing folders add so much texture to our cards. And who doesn’t want an easy, quick way to add interest? Today I will be sharing just 2 ways you can use your embossing folders.
Card #1:
For my first card, I embossed the daisy background onto a piece of white cardstock. Then, I die cut the three different daisies out of white cardstock. Next, I placed them inside the embossing folder and ran it through my diecutting machine. This added some gorgeous texture to the blooms. I used Copic markers to color each of the daisies. These are the colors I used: W00, W2, W3, Y02,Y08, Y24 and E99. I used a stippling technique for the flower centers to emphasize the texture the embossing folder adds.
Then, I adhered the embossed panel to an A2, top folding card base and went through my stash of Simon Says Stamp sentiment strips to find the perfect sentiment. I cut the sentiment strip and adhered it to the embossed panel. Lastly, I added the die cut daisies to the panel.
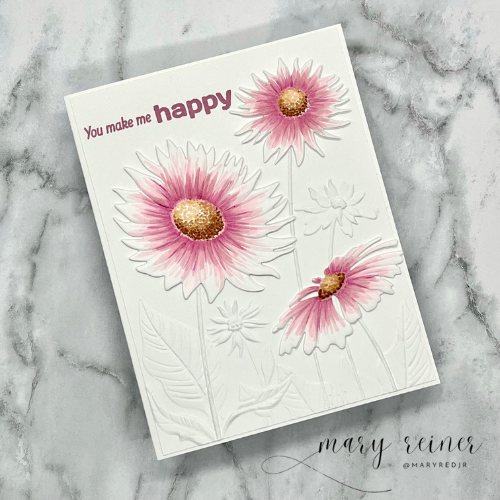
Card #2:
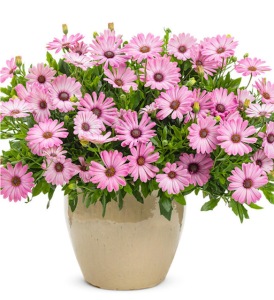
Did you know there is a plant called African Daisy? I did not know about this until I started looking for color ideas for the daisies. Below is a photo of a Pink African Daisy plant that was helpful in selecting my colors.
I really like how these turned out! This card was put together almost exactly like the first card – except I stamped the sentiment from SSS Rainbow is My Favorite Color stamp set in Concord and 9th Briar Rose ink. I colored the daisies with the following Copic markers: RV00, RV11, RV32, RV55, E04, E13 and E21.
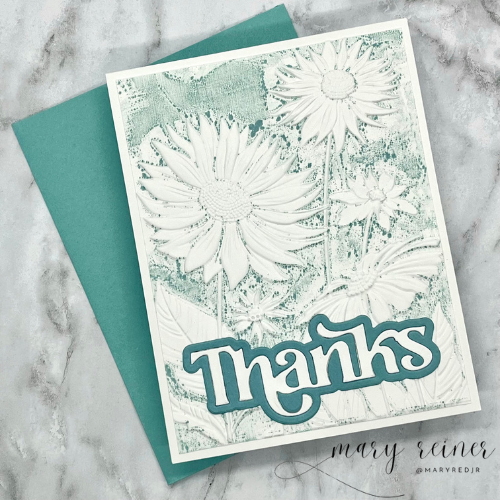
Card #3:
I really had fun creating this card! I started by inking the inside of the embossing folder with Speckled Egg Distress Ink. I used a brayer to apply the ink. Next, I lightly spritzed the folder and placed my 100# white cardstock inside. I ran it through my die cutting machine a few times. I thought about reapplying the ink and running it through again, but I didn’t want a solid background…I was happy with the splattered look I acheived. Next, I trimmed it down and adhered it to a top folding, A2 cardbase. For the sentiment, I used the SSS Thanks die. I die cut it out of white and blue cardstock to match the background.
Which card is your favorite? I hope I have inspired you to play with your embossing folders.
Below is an affiliate link, if you would like to shop the new release or pick up some other supplies.
It is time for another fun release from Simon Says Stamp!
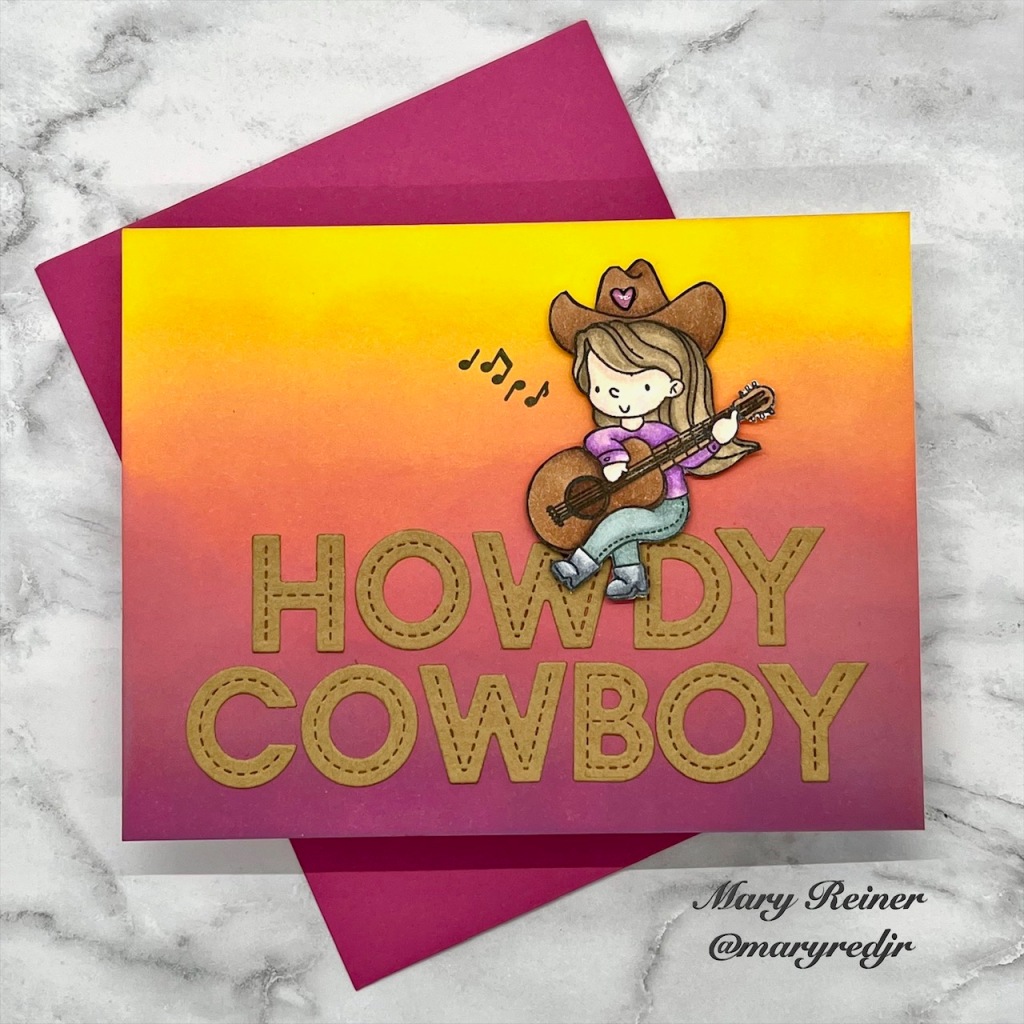
Today, I am sharing two cards I created using the new stamp set, “Howdy.” This cute set is full of lots of western icons, two adorable little cowgirls, and some fun sentiments.
To create the background, I ink blended the following Distress Oxides colors:
Fossilized Amber
Carved Pumpkin
Picked Raspberries
Seedless Preserves
I wanted the background to mimic a desert sunset.
I stamped the cowgirl in Momento Tuxedo Black ink and colored her with Copic markers. There are dies available for this stamp set, but I did not have them, so I fussy cut her.
Next, I die cut the letters from Lawn Fawn’s Olliver’s ABC’s and adhered them to the background.
Then, I added foam adhesive to the back of the cowgirl and adhered her to the card. To finish the card, I adhered it to an A2 card base.
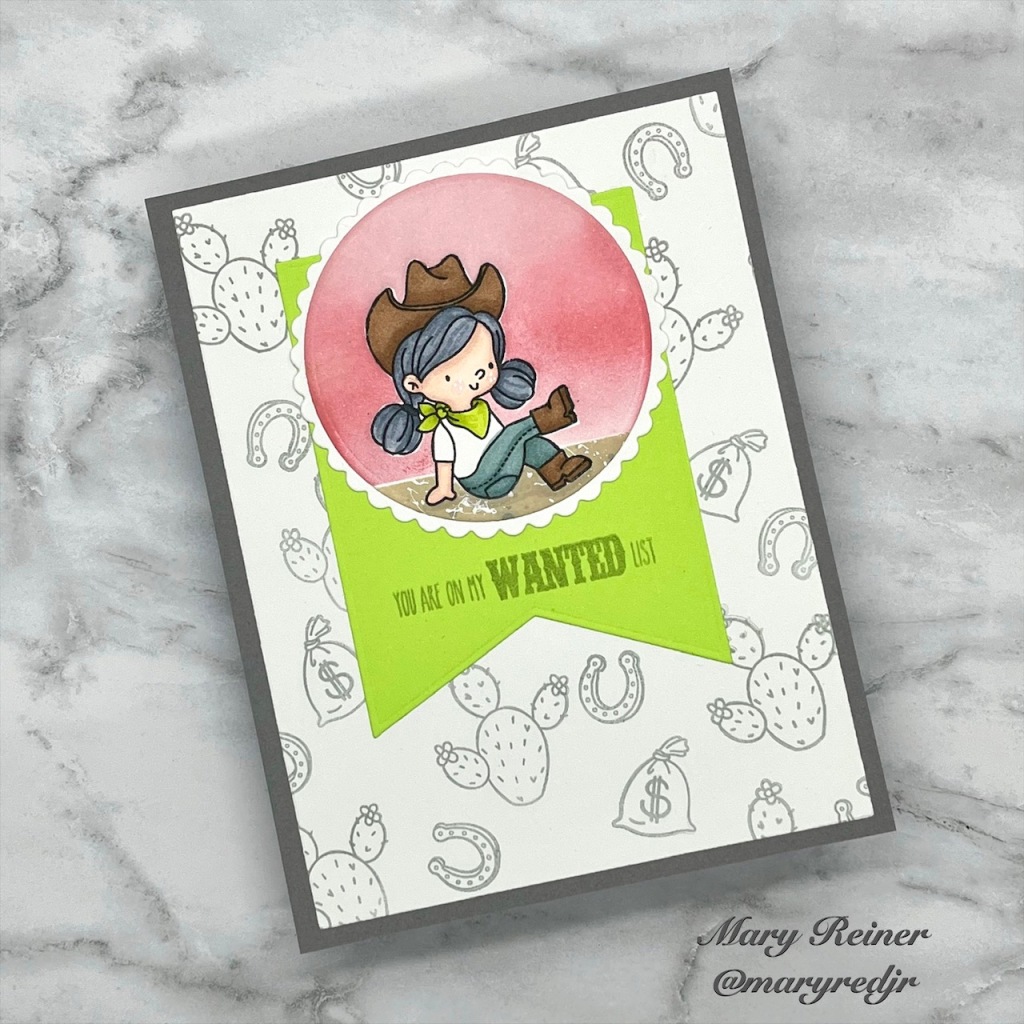
To begin, I stamped the cowgirl in Momento Tuxedo Black Ink onto cardstock and also onto a piece of GinaK Masking Magic. I cut out the mask and covered up the cowgirl image. I did a little ink blending using Worn Lipstick and Tea Dye. I splattered white, acrylic paint to add texture to the ground.
I removed the mask, and used Copic markers to color the image and then die cut it with a circle die. I also die cut a scalloped circle and adhered the two together.
Next, I created the patterned background by stamping various images from the set in Concord and 9th Dove Ink.
I thought the card needed a bit more color, so I die cut a green banner and adhered it to the card and added the circles on top. Then I stamped the sentiment below.
Lastly, I adhered the whole panel to a grey A2 top folding card base.
I had so much fun creating with this darling set!
Below is a link to check out the whole release. I hope you will consider using my affiliate link.
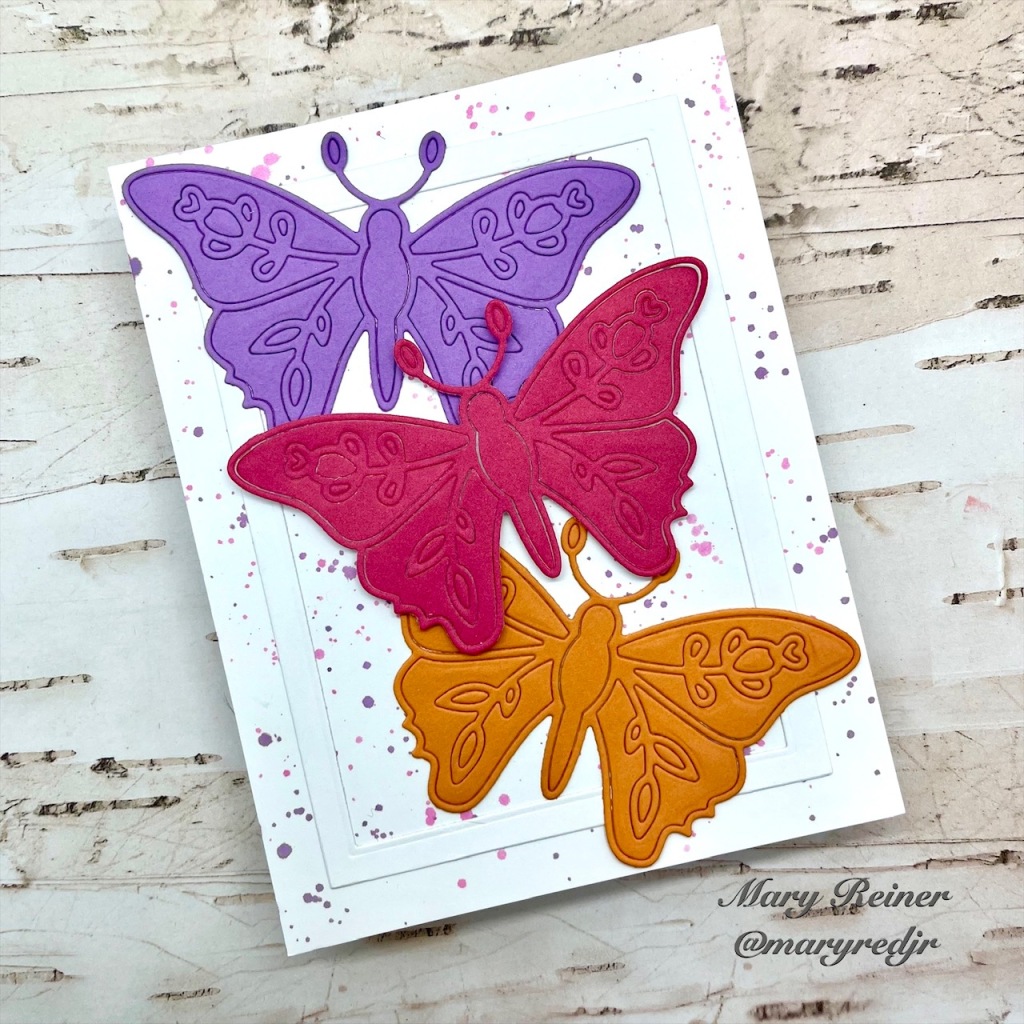
It’s time for another wonderful release from Simon Says Stamp. The whole release can be found here: https://bit.ly/4314N9j
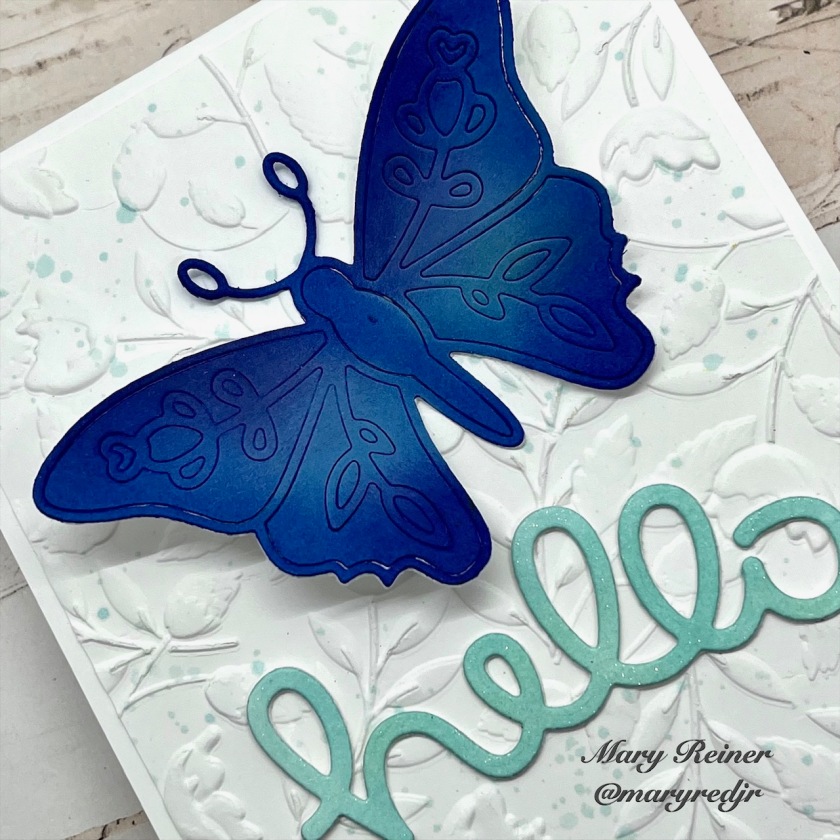
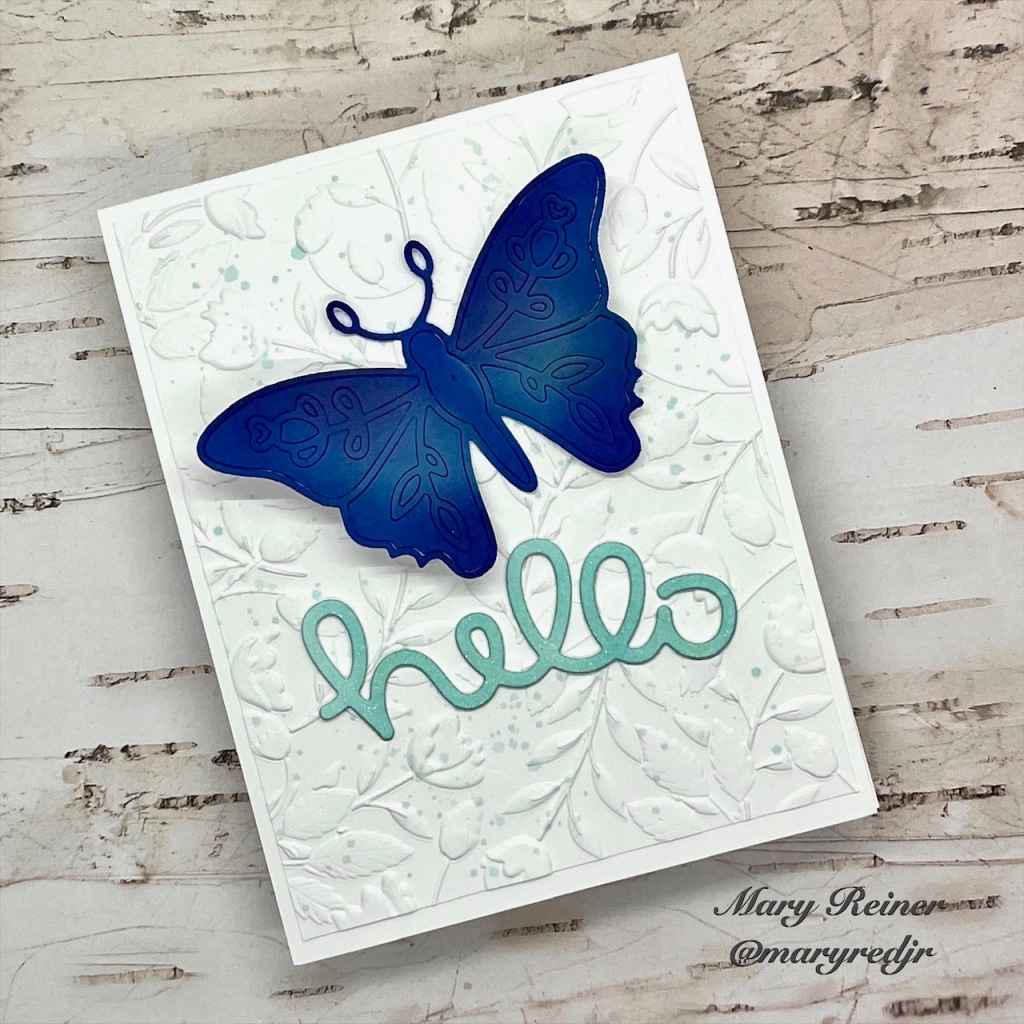
My cards feature the brand new Rose-Winged Butterfly Die. It is such a pretty die and I love it’s size too.
I created two cards with this new die:
I die cut the butterfly out of blue card stock, then inked it up with Uncharted Mariner and Speckled Egg Distress Oxides. Using an embossed, Speckled Egg spattered panel, I adhered the butterfly with foam tape. I added the Scripty Hello to finish it off.
For this card, I simply die cut the butterflies from 3 different colors of card stock. I adhered the purple and the orange butterflies directly onto my spattered card base. Then, I used foam tape to pop up the bright, pink butterfly. I did not add a sentiment as I thought this would work for a variety of occasions including Mother’s Day.
Are you planning on attending Simon Says Stamp Create? You need to be there! It is going to be so much fun. I would love to meet you and say hello. Below are some details about the event.
Who: Crafty people (and even people who don’t think they are creative!)
What: Create It Take Its from 25+ of your favorite vendors (including Simon Says Stamp)
Where: Nationwide Hotel and Conference Center, Lewis Center, OH
When: April 21 & 22
On-site store with products right there for you to touch and buy.
See lots of cards and projects on display in the store.
Hob nob with some of the biggest names in the industry.